Enterprise Install
Refer to the following sections to troubleshoot errors encountered when installing an Enterprise Cluster.
Scenario - Palette/VerteX Management Appliance Installation Stalled due to piraeus-operator Pack in Error State
During the installation of the Palette or
VerteX Management Appliance, the piraeus-operator
pack can enter an error state in Local UI. This can be caused by stalled creation of Kubernetes secrets in the
piraeus-system namespace and can prevent the installation from completing successfully.
To resolve, you can manually delete any secrets in the piraeus-system namespace that have a pending-install status
label. This will allow the piraeus-operator pack to complete its deployment and the Palette/VerteX Management
Appliance installation to proceed.
Debug Steps
-
Log in to the Local UI of the leader node of your Palette/VerteX management cluster. By default, Local UI is accessible at
https://<node-ip>:5080. Replace<node-ip>with the IP address of the leader node. -
From the left main menu, click Cluster.
-
Download the Admin Kubeconfig File by clicking on the
<cluster-name>.kubeconfighyperlink. -
Open a terminal session in an environment that has network access to the Palette/VerteX management cluster.
-
Issue the following command to set the
KUBECONFIGenvironment variable to the path of the kubeconfig file you downloaded in step 3.export KUBECONFIG=<path-to-kubeconfig-file> -
Use
kubectlto list all secrets in thepiraeus-systemnamespace.kubectl get secrets --namespace piraeus-systemExample outputNAME TYPE DATA AGE
sh.helm.release.v1.piraeusoperator-linstor-gui.v1 helm.sh/release.v1 1 1h
sh.helm.release.v1.piraeusoperator-linstor-gui.v2 helm.sh/release.v1 1 1h
sh.helm.release.v1.piraeusoperator-piraeus-cluster.v1 helm.sh/release.v1 1 1h
sh.helm.release.v1.piraeusoperator-piraeus-dashboard.v1 helm.sh/release.v1 1 1h
sh.helm.release.v1.piraeusoperator-piraeus.v1 helm.sh/release.v1 1 1h
sh.helm.release.v1.piraeusoperator-piraeus.v2 helm.sh/release.v1 1 1h -
Use the following command to check each secret for a
pending-installstatus label. Replace<secret-name>with the name of the secret you want to check.kubectl describe secrets <secret-name> --namespace piraeus-systemExample outputName: sh.helm.release.v1.piraeusoperator-piraeus-cluster.v1
Namespace: piraeus-system
Labels: modifiedAt=0123456789
name=piraeusoperator-piraeus-cluster
owner=helm
status=pending-install
version=1
Annotations: <none>
Type: helm.sh/release.v1
Data
====
release: 7156 bytestipYou can also try using the following command to filter for secrets with a
pending-installstatus label.kubectl describe secrets --namespace piraeus-system --selector status=pending-install -
If you find any secrets with this label, delete them using the following command. Replace
<secret-name>with the name of the secret you want to delete.kubectl delete secrets <secret-name> --namespace piraeus-system -
After deleting any secrets with a
pending-installstatus label, wait for thepiraeus-operatorpack to enter a Running status in Local UI. The installation of Palette/VerteX Management Appliance should then proceed successfully.
Scenario - Unexpected Logouts in Tenant Console After Palette/VerteX Management Appliance Installation
After installing self-hosted Palette/Palette VerteX using the Palette Management Appliance or VerteX Management Appliance, you may experience unexpected logouts when using the tenant console. This can be caused by a time skew on your Palette/VerteX management cluster nodes, which leads to authentication issues.
To verify the system time, open a terminal session on each node in your Palette/VerteX management cluster and issue the following command to check the system time.
timedatectl
An output similar to the following will be displayed. A time skew is indicated by the Local time and Universal time
values being different across the nodes.
- Example output from node 1
- Example output from node 2
- Example output from node 3
               Local time: Fri 2025-07-11 09:41:42 UTC
           Universal time: Fri 2025-07-11 09:41:42 UTC
                 RTC time: Fri 2025-07-11 09:41:42
                Time zone: UTC (UTC, +0000)
System clock synchronized: no
              NTP service: active
          RTC in local TZ: no
               Local time: Fri 2025-07-11 09:41:45 UTC
           Universal time: Fri 2025-07-11 09:41:45 UTC
                 RTC time: Fri 2025-07-11 09:41:45
                Time zone: UTC (UTC, +0000)
System clock synchronized: no
              NTP service: active
          RTC in local TZ: no
               Local time: Fri 2025-07-11 09:41:49 UTC
           Universal time: Fri 2025-07-11 09:41:49 UTC
                 RTC time: Fri 2025-07-11 09:41:49
                Time zone: UTC (UTC, +0000)
System clock synchronized: no
              NTP service: active
          RTC in local TZ: no
You may also notice errors in the auth-* pod logs in the hubble-system namespace similar to the following.
kubectl logs --namespace hubble-system auth-5f95c77cb-49jtv
auth-5f95c77cb-49jtv Jul  7 17:22:46.378 ERROR [hubble_token.go:426/hucontext.getClaimsFromToken] [Unable to parse the token 'abcd...1234' due to Token used before
issued]
auth-5f95c77cb-49jtv Jul  7 17:22:46.378 ERROR [auth_service.go:282/service.(*AuthService).Logout] [provided token 'xxxxx' is not valid Token used before issued]
This indicates that the system time on your Palette/VerteX management cluster nodes is not synchronized with a Network Time Protocol (NTP) server. To resolve this issue, you can configure an NTP server in the Palette/VerteX management cluster settings.
Debug Steps
-
Log in to Local UI of the leader node of your Palette/VerteX management cluster.
-
On the left main menu, click Cluster.
-
Click Actions in the top-right corner and select Cluster Settings from the drop-down menu.
-
In the Network Time Protocol (NTP) (Optional) field, enter the NTP server that you want to use for your Palette/VerteX management cluster. For example, you can use
pool.ntp.orgor any other NTP server that is accessible from your Palette/VerteX management cluster nodes. -
Click Save Changes to apply the changes.
Scenario - IP Pool Exhausted During Airgapped Upgrade
When upgrading a self-hosted airgapped cluster to version 4.6.32, the IPAM controller may report an Exhausted IP Pools
error despite having available IP addresses. This is due to a race condition in CAPV version 1.12.0, which may lead to
an orphaned IP claim when its associated VMware vSphere machine is deleted during the control plane rollout. When this
occurs, the IP claim and IP address are not cleaned up, keeping the IP reserved and exhausting the IP pool. To complete
the upgrade, you must manually release the orphaned claim holding the IP address.
Debug Steps
-
Open up a terminal session in an environment that has network access to the cluster. Refer to Access Cluster with CLI for additional guidance.
-
Issue the following command to list the IP addresses of the current nodes in the cluster.
infoThe airgap support VM is not listed, only the nodes in the cluster.
kubectl get nodes \
--output jsonpath='{range .items[*]}{.status.addresses[?(@.type=="InternalIP")].address}{"\n"}{end}'
Example output10.10.227.13
10.10.227.11
10.10.227.14 -
List all IP claims in the
spectro-mgmtnamespace. The basespectro-mgmt-clusterclaim belongs to the airgap support VM.kubectl get ipclaim --namespace spectro-mgmtExample outputNAMESPACE NAME AGE
spectro-mgmt spectro-mgmt-cluster 29h
spectro-mgmt spectro-mgmt-cluster-cp-43978-dw858-0 14h
spectro-mgmt spectro-mgmt-cluster-cp-43978-p2bpg-0 29h
spectro-mgmt spectro-mgmt-cluster-cp-dt44d-0 14h
spectro-mgmt spectro-mgmt-cluster-cp-qx4vw-0 6m -
Map each claim to its allocated IP.
kubectl get ipclaim --namespace spectro-mgmt \
--output jsonpath='{range .items[*]}{.metadata.name}{"\t"}{.status.address.name}{"\n"}{end}'
Compare the IP addresses of the nodes in the cluster to the IP addresses in the claim list, ignoring the
spectro-mgmt-clusterclaim of the airgap support VM. The IP that appears in the claim list that does not appear in the node list is the orphaned claim. In the below example, the orphaned claim isspectro-mgmt-cluster-cp-qx4vw-0, which is tied to the IP address 10.10.227.12 (spectro-mgmt-cluster-cluster1-10-10-227-12).Example outputspectro-mgmt-cluster spectro-mgmt-cluster-cluster1-10-10-227-10
spectro-mgmt-cluster-cp-43978-dw858-0 spectro-mgmt-cluster-cluster1-10-10-227-14
spectro-mgmt-cluster-cp-43978-p2bpg-0 spectro-mgmt-cluster-cluster1-10-10-227-13
spectro-mgmt-cluster-cp-dt44d-0 spectro-mgmt-cluster-cluster1-10-10-227-11
spectro-mgmt-cluster-cp-qx4vw-0 spectro-mgmt-cluster-cluster1-10-10-227-12 -
Delete the orphaned claim.
kubectl delete ipclaim --namespace spectro-mgmt <claim-name>Example commandkubectl delete ipclaim --namespace spectro-mgmt spectro-mgmt-cluster-cp-qx4vw-0 -
Re-run the upgrade. For guidance, refer to the applicable upgrade guide for your airgapped instance of Palette or VerteX.
Scenario - Self-Linking Error
When installing an Enterprise Cluster, you may encounter an error stating that the enterprise cluster is unable to self-link. Self-linking is the process of Palette or VerteX becoming aware of the Kubernetes cluster it is installed on. This error may occur if the self-hosted pack registry specified in the installation is missing the Certificate Authority (CA). This issue can be resolved by adding the CA to the pack registry.
Debug Steps
-
Log in to the pack registry server that you specified in the Palette or VerteX installation.
-
Download the CA certificate from the pack registry server. Different OCI registries have different methods for downloading the CA certificate. For Harbor, check out the Download the Harbor Certificate guide.
-
Log in to the system console. Refer to Access Palette system console or Access Vertex system console for additional guidance.
-
From the left navigation menu, select Administration and click on the Pack Registries tab.
-
Click on the three-dot Menu icon for the pack registry that you specified in the installation and select Edit.
-
Click on the Upload file button and upload the CA certificate that you downloaded in step 2.
-
Check the box Insecure Skip TLS Verify and click on Confirm.
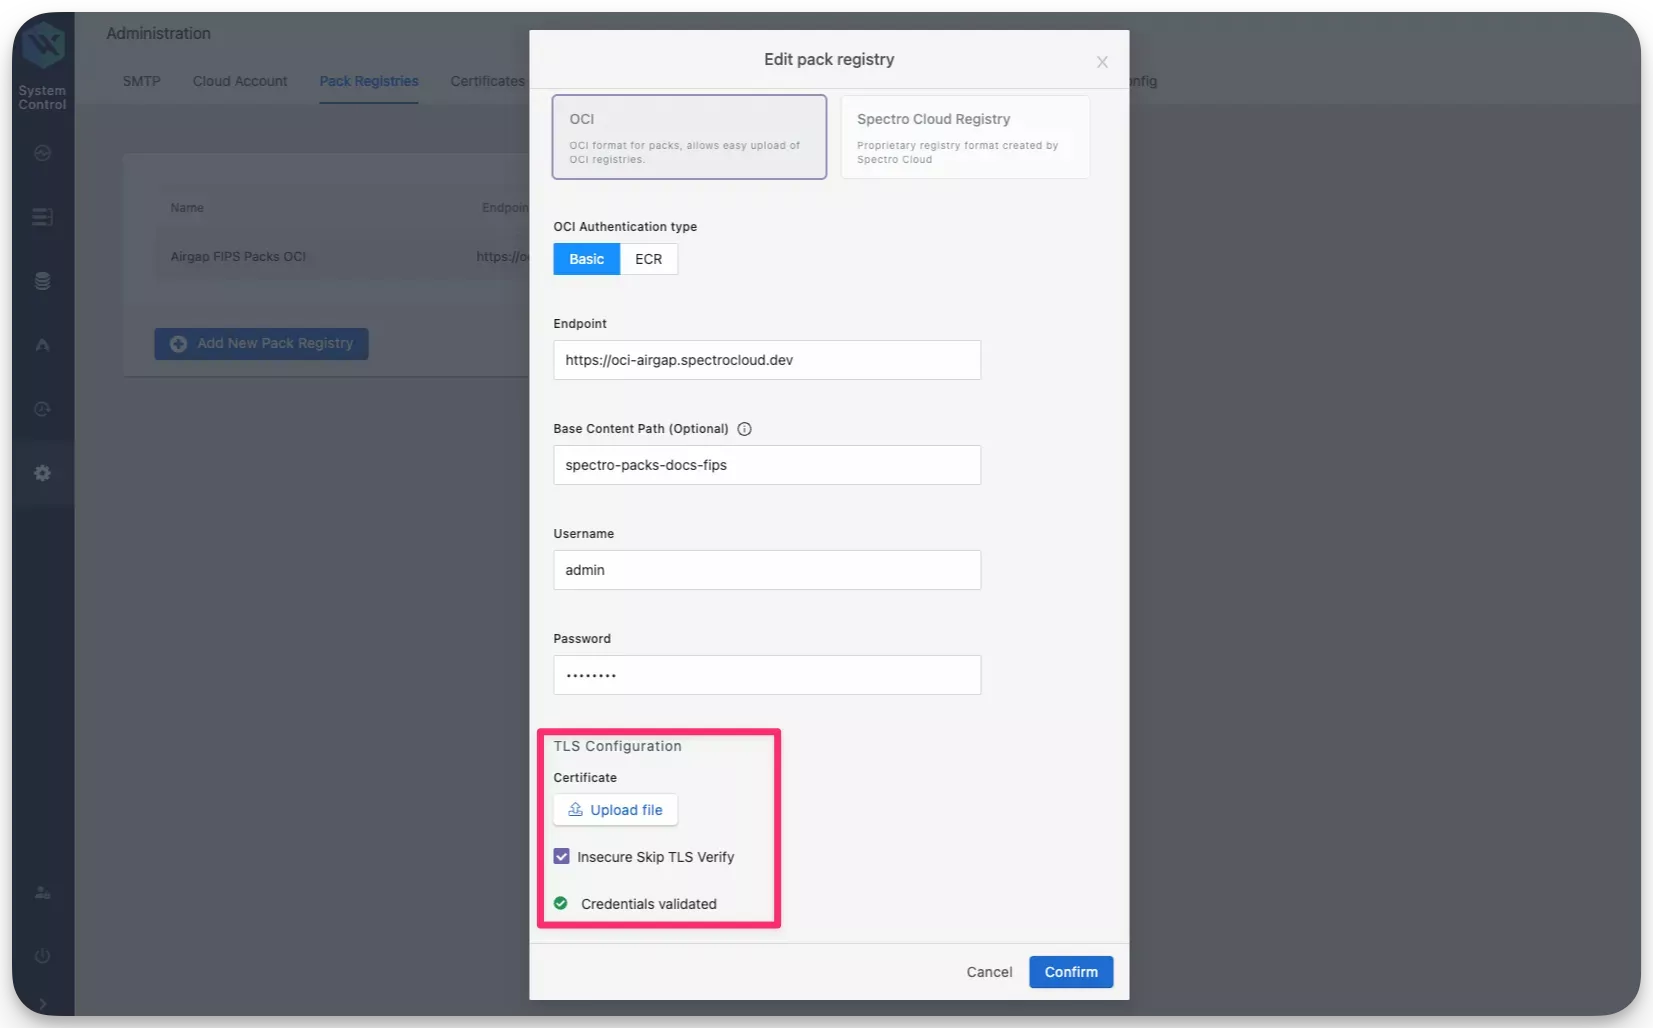
After a few moments, a system profile will be created and Palette or VerteX will be able to self-link successfully. If you continue to encounter issues, contact our support team by emailing support@spectrocloud.com so that we can provide you with further guidance.
Scenario - Enterprise Backup Stuck
In the scenario where an enterprise backup is stuck, a restart of the management pod may resolve the issue. Use the following steps to restart the management pod.
Debug Steps
-
Open up a terminal session in an environment that has network access to the Kubernetes cluster. Refer to the Access Cluster with CLI for additional guidance.
-
Identify the
mgmtpod in thehubble-systemnamespace. Use the following command to list all pods in thehubble-systemnamespace and filter for themgmtpod.kubectl get pods --namespace hubble-system | grep mgmtmgmt-f7f97f4fd-lds69 1/1 Running 0 45m -
Restart the
mgmtpod by deleting it. Use the following command to delete themgmtpod. Replace<mgmt-pod-name>with the actual name of themgmtpod that you identified in step 2.kubectl delete pod <mgmt-pod-name> --namespace hubble-systempod "mgmt-f7f97f4fd-lds69" deleted
Scenario - Non-Unique vSphere CNS Mapping
In Palette and VerteX releases 4.4.8 and earlier, Persistent Volume Claims (PVCs) metadata do not use a unique identifier for self-hosted Palette clusters. This causes incorrect Cloud Native Storage (CNS) mappings in vSphere, potentially leading to issues during node operations and upgrades.
This issue is resolved in Palette and VerteX releases starting with 4.4.14. However, upgrading to 4.4.14 will not automatically resolve this issue. If you have self-hosted instances of Palette in your vSphere environment older than 4.4.14, you should execute the following utility script manually to make the CNS mapping unique for the associated PVC.
Debug Steps
-
Ensure your machine has network access to your self-hosted Palette instance with
kubectl. Alternatively, establish an SSH connection to a machine where you can access your self-hosted Palette instance withkubectl. -
Log in to your self-hosted Palette instance System Console.
-
In the Main Menu, click Enterprise Cluster.
-
In the cluster details page, scroll down to the Kubernetes Config File field and download the kubeconfig file.
-
Issue the following command to download the utility script.
curl --output csi-helper https://software.spectrocloud.com/tools/csi-helper/csi-helper -
Adjust the permission of the script.
chmod +x csi-helper -
Issue the following command to execute the utility script. Replace the placeholder with the path to your kubeconfig file.
./csi-helper --kubeconfig=<PATH_TO_KUBECONFIG> -
Issue the following command to verify that the script has updated the cluster ID.
kubectl describe configmap vsphere-cloud-config --namespace=kube-systemIf the update is successful, the cluster ID in the ConfigMap will have a unique ID assigned instead of
spectro-mgmt/spectro-mgmt-cluster.Name: vsphere-cloud-config
Namespace: kube-system
Labels: component=cloud-controller-manager
vsphere-cpi-infra=config
Annotations: cluster.spectrocloud.com/last-applied-hash: 17721994478134573986
Data
====
vsphere.conf:
----
[Global]
cluster-id = "896d25b9-bfac-414f-bb6f-52fd469d3a6c/spectro-mgmt-cluster"
[VirtualCenter "vcenter.spectrocloud.dev"]
insecure-flag = "true"
user = "example@vsphere.local"
password = "************"
[Labels]
zone = "k8s-zone"
region = "k8s-region"
BinaryData
====
Events: <none>
Scenario - "Too Many Open Files" in Cluster
When viewing logs for Enterprise or Private Cloud Gateway clusters, you may encounter a "too many open files" error, which prevents logs from tailing after a certain point. To resolve this issue, you must increase the maximum number of file descriptors for each node on your cluster.
Debug Steps
Repeat the following process for each node in your cluster.
-
Log in to a node in your cluster.
ssh -i <key-name> <spectro@hostname> -
Switch to
sudomode using the command that best fits your system and preferences.sudo --login -
Increase the maximum number of file descriptors that the kernel can allocate system-wide.
echo "fs.file-max = 1000000" > /etc/sysctl.d/99-maxfiles.conf -
Apply the updated
sysctlsettings. The increased limit is returned.sysctl -p /etc/sysctl.d/99-maxfiles.conffs.file-max = 1000000 -
Restart the
kubeletandcontainerdservices.systemctl restart kubelet containerd -
Confirm that the change was applied.
sysctl fs.file-maxfs.file-max = 1000000
Scenario - MAAS and VMware vSphere Clusters Fail Image Resolution in Non-Airgap Environments
In Palette or VerteX non-airgap installations with versions 4.2.13 to 4.5.22, MAAS and VMware vSphere clusters may fail to provision due to image resolution errors. These environments have incorrectly configured default image endpoints. To resolve this issue, you must manually set these endpoints.
Debug Steps
-
Open a terminal with connectivity to your self-hosted environment.
-
Execute the following command to save the base URL of your Palette instance API to the
BASE_URLenvironment value. Add your correct URL in place ofREPLACE_ME.export BASE_URL="REPLACE ME" -
Use the following command to log in to the Palette System API by using the
/v1/auth/sysloginendpoint. Ensure you replace the credentials below with your system console credentials.curl --location '$BASE_URL/v1/auth/syslogin' \
--header 'Content-Type: application/json' \
--data '{
"password": "**********",
"username": "**********"
}'The output displays the authorization token.
{
  "Authorization": "**********.",
  "IsPasswordReset": true
} -
Copy the authorization token to your clipboard and assign it to an environment variable. Replace the placeholder below with the value from the output.
export TOKEN=********** -
Execute the following command to set the MAAS image endpoint to
https://maasgoldenimage.s3.amazonaws.com. Replace thecaCertvalue below with the Certificate Authority (CA) certificate for your self-hosted environment.curl --request PUT '$BASE_URL/v1/system/config/maas/image' \
--header 'Authorization: $TOKEN' \
--header 'Content-Type: application/json' \
--data '{
"spec": {
"imagesHostEndpoint": "https://maasgoldenimage.s3.amazonaws.com",
"insecureSkipVerify": false,
"caCert": "**********"
}
}' -
Execute the following command to set the VMware vSphere image endpoint to
https://vmwaregoldenimage.s3.amazonaws.com. Replace thecaCertvalue below with the Certificate Authority (CA) certificate for your self-hosted environment.curl --request PUT '$BASE_URL/v1/system/config/vsphere/image' \
--header 'Authorization: $TOKEN' \
--header 'Content-Type: application/json' \
--data '{
"spec": {
"imagesHostEndpoint": "https://vmwaregoldenimage.s3.amazonaws.com",
"insecureSkipVerify": false,
"caCert": "**********"
}
}'
MAAS and VMware vSphere clusters will now be successfully provisioned on your self-hosted Palette environment.