Edge
The following are common scenarios that you may encounter when using Edge.
Scenario - content-length: 0 Errors during Content Synchronization
Unintended or non-graceful reboots during content bundle push operations can cause inconsistency in the primary
registry, resulting in 0-byte blob files and subsequent content-length: 0 errors during content synchronization.
When operating a locally managed cluster, if you observe the content-length: 0 error during content sync, follow the
steps below to verify whether the error was caused by an inconsistency in the primary registry and to fix the issue.
Debug Steps
-
Issue the following command and observe if there are files that are zero bytes in size.
ls -la /usr/local/spectrocloud/peerbundle/sha256/If you observe output similar to the following, where the file size is zero, proceed to the next step.
-rw------- 1 root root 0 Aug 11 01:52 /usr/local/spectrocloud/peerbundle/sha256 -
Issue the following command to remove all files with zero size.
sudo find /usr/local/spectrocloud/peerbundle/sha256/ -type f -size 0 -delete -
Restart the Palette agent service and verify that it is active.
sudo systemctl restart spectro-stylus-agent.service
sudo systemctl status spectro-stylus-agent.service
This will resolve the issue and content sync will proceed normally.
Scenario – PXK-E Clusters on RHEL and Rocky 8 Fail Kubernetes Initialization
Palette eXtended Kubernetes - Edge (PXK-E) clusters
running Kubernetes v1.32.x or later on RHEL or Rocky Linux 8.x may experience failure during Kubernetes initialization.
This occurs because RHEL and Rocky 8.x come with kernel version 4.18.x, which does not meet the
kubeadm system requirements introduced in Kubernetes
v1.32.x. You can observe the following error in kube-init logs.
[ERROR SystemVerification]: kernel release 4.18.0-553.16.1.el8_10.x86_64 is unsupported. Recommended LTS version from the 4.x series is 4.19. Any 5.x or 6.x versions are also supported. For cgroups v2 support, the minimal version is 4.15 and the recommended version is 5.8+...
There are several possible ways to troubleshoot this issue:
- Rebuild the OS using RHEL or Rocky Linux 9.x, as they come with kernel 5.14+ by default.
- Update the kernel version.
Debug Steps - Update the Kernel Version
Limitations
- Appliance mode is supported only for RHEL-based images and is not supported for Rocky Linux.
Debug Steps - Update the Kernel Version for Appliance Mode
-
Customize the
Dockerfilein theCanvOSdirectory. Find the conditional block for RHEL.RUN if [ "${OS_DISTRIBUTION}" = "rhel" ]; then \
cp -a /certs/. /etc/pki/ca-trust/source/anchors/ && \
update-ca-trust; \
fiUpdate it as in the example below to install a supported kernel version using ELRepo.
RUN if [ "${OS_DISTRIBUTION}" = "rhel" ]; then \
    cp --archive /certs/. /etc/pki/ca-trust/source/anchors/ && \
    update-ca-trust && \
    dnf install --assumeyes https://www.elrepo.org/elrepo-release-8.el8.elrepo.noarch.rpm && \
    dnf update --assumeyes && \
    dnf --enablerepo=elrepo-kernel install --assumeyes kernel-lt kernel-lt-modules-extra && \
    dnf clean all; \
fi -
Rebuild the ISO and provider image and redeploy the cluster.
-
After the deployment is complete, issue the following command on the node to ensure the kernel version is 5.x.
uname --kernel-release
Debug Steps - Update the Kernel Version for Agent Mode
-
Install a supported kernel version using ELRepo. Establish an SSH connection to the PXK-E node and issue the following commands.
dnf install --assumeyes https://www.elrepo.org/elrepo-release-8.el8.elrepo.noarch.rpm
dnf update --assumeyes
dnf --enablerepo=elrepo-kernel install --assumeyes kernel-lt kernel-lt-modules-extra
reboot -
Issue the following command after the reboot to ensure the kernel version is 5.x.
uname --kernel-release
Scenario - PXK-E Clusters in VerteX Deployments Experience Failure upon Reboot
When rebooting control plane nodes in Palette eXtended Kubernetes - Edge (PXK-E) clusters
deployed via VerteX, the kube-vip component may fail to start due to early DNS resolution issues. You can observe
repeated errors in the system logs using journalctl --unit=kubelet.
E0619 21:53:53.613367       1 leaderelection.go:327] error retrieving resource lock kube-system/plndr-cp-lock: Get "https://kubernetes:6443/apis/coordination.k8s.io/v1/namespaces/kube-system/leases/plndr-cp-lock": dial tcp: lookup kubernetes on 10.10.128.8:53: no such host
E0619 21:54:00.647219       1 leaderelection.go:327] error retrieving resource lock kube-system/plndr-cp-lock: Get "https://kubernetes:6443/apis/coordination.k8s.io/v1/namespaces/kube-system/leases/plndr-cp-lock": dial tcp: lookup kubernetes on 10.10.128.8:53: no such host
Although DNS becomes available shortly after boot, kube-vip does not recover automatically. To fix this, stop and
remove the container manually. The kubelet then restarts the component using the current system state.
Debug Steps
-
On each control plane node, list all operating
kube-vipcontainers using thecrictltool.crictl ps 2>/dev/null | grep kube-vip | awk '{print $1}' -
Stop and remove each container.
crictl stop <container-id> && crictl rm <container-id>
Scenario - Canonical Edge Clusters in Proxied Environments Experience Failure upon Reboot
When rebooting nodes in an Edge cluster using Palette Optimized Canonical deployed in a proxied environment, the nodes
may fail to come back online. To prevent this, add the second IP address in the service_cidr range from the Canonical
pack to the NO_PROXY list in your Edge installer user-data.
Debug Steps
-
Log in to Palette.
-
From the left Main Menu, select Profiles. Then select the profile you will use to deploy your cluster.
-
Select the Kubernetes layer, the
Palette Optimized Canonicalpack. Click values.yaml to view the values. -
Take note of the
service_cidrvalue inpack.cluster.config. -
Add the second IP of the CIDR block in the
service_cidrrange to thestylus.site.network.noProxyparameter. For example, if yourservice_cidris192.169.0.0/16, you need to add192.169.0.1to the parameter.Example#cloud-config
stylus:
site:
paletteEndpoint: api.spectrocloud.com
edgeHostToken: <yourRegistrationToken>
projectName: edge-sites
tags:
city: chicago
building: building-1
zip-code: 95135
network:
httpProxy: http://proxy.example.com
httpsProxy: https://proxy.example.com
noProxy: 10.10.128.10,10.0.0.0/8,192.169.0.1
nameserver: 1.1.1.1
Scenario - Cilium Pod Stuck During Kubernetes Upgrade Due to nsenter Permission Issue
During a Kubernetes upgrade, the Cilium pod may get stuck in the Init:CrashLoopBackoff state due to nsenter permission
issues. To address the issue, patch the cilium DaemonSet with the specified annotations.
Debug Steps
-
Connect to your cluster via
kubectl. -
Issue the following command to edit the DaemonSet.
kubectl --namespace kube-system edit ds cilium -
Add the following annotations to the DaemonSet.
spec:
  template:
    metadata:
      annotations:
        container.apparmor.security.beta.kubernetes.io/cilium-agent: "unconfined"
        container.apparmor.security.beta.kubernetes.io/mount-cgroup: "unconfined"
        container.apparmor.security.beta.kubernetes.io/clean-cilium-state: "unconfined"
        container.apparmor.security.beta.kubernetes.io/apply-sysctl-overwrites: "unconfined"
Scenario - Cluster Creation Failure Due to Nodeadm not Found
When attempting to deploy a cluster with Palette eXtended Kubernetes - Edge (PXK-E)
and agent mode on Palette agent version 4.5.14, adding a custom stylus.path to
the user-data file causes cluster creation to fail as it cannot find
kubeadm. A custom stylus.path can be added during the
Install Palette Agent steps.
Refer to Identify the Target Agent Version for guidance in retrieving your Palette agent version number.
To resolve this scenario, add a cloud-init stage to your BYOS Edge OS pack configuration by following the debug steps below.
Debug Steps
-
Log in to Palette.
-
From the left Main Menu, select Profiles.
-
On the Profiles page, find and click on your cluster profile.
-
Select the OS layer of your cluster profile.
-
Click Values in the Pack Details section. In the YAML editor, add the following entry.
stages:
  initramfs:
    - name: "Workaround for kubeadm path issue in Palette agent v4.5.14"
      if: "[ ! -f /usr/bin/kubeadm ]"
      commands:
        - cp <customStylusPath>/usr/bin/kubeadm /usr/bin/
        - reboot now
Replace
<customStylusPath>with the customstylus.pathyou provided in the user-data file during the Install Palette Agent steps, as demonstrated in the following example.pack:
content:
images:
- image: "{{.spectro.pack.edge-native-byoi.options.system.uri}}"
options:
---
stages:
initramfs:
- name: "Workaround for kubeadm path issue in Palette agent v4.5.14"
if: "[ ! -f /usr/bin/kubeadm ]"
commands:
- cp /persistent/spectro/usr/bin/kubeadm /usr/bin/
- reboot now -
Click Confirm Updates to save your changes.
-
Click Save Changes on the cluster profile page.
-
Deploy your cluster using the updated cluster profile.
Scenario - IP Address not Assigned to Edge Host
When you add a new VMware vSphere Edge host to an Edge cluster, the IP address may fail to be assigned to the Edge host after a reboot.
Debug Steps
-
Access the Edge host through the vSphere Web Console.
-
Issue the following command.
networkctl reloadThis command restarts the Edge host network and allows the Edge host to receive an IP address.
Scenario - Override or Reconfigure Read-only File System Stage
If you need to override or reconfigure the read-only file system, you can do so using the following steps.
Debug Steps
-
Power on the Edge host.
-
Press the keyboard key
Eafter highlighting the menu ingrubmenu. -
Type
rd.cos.debugrwand pressEnter.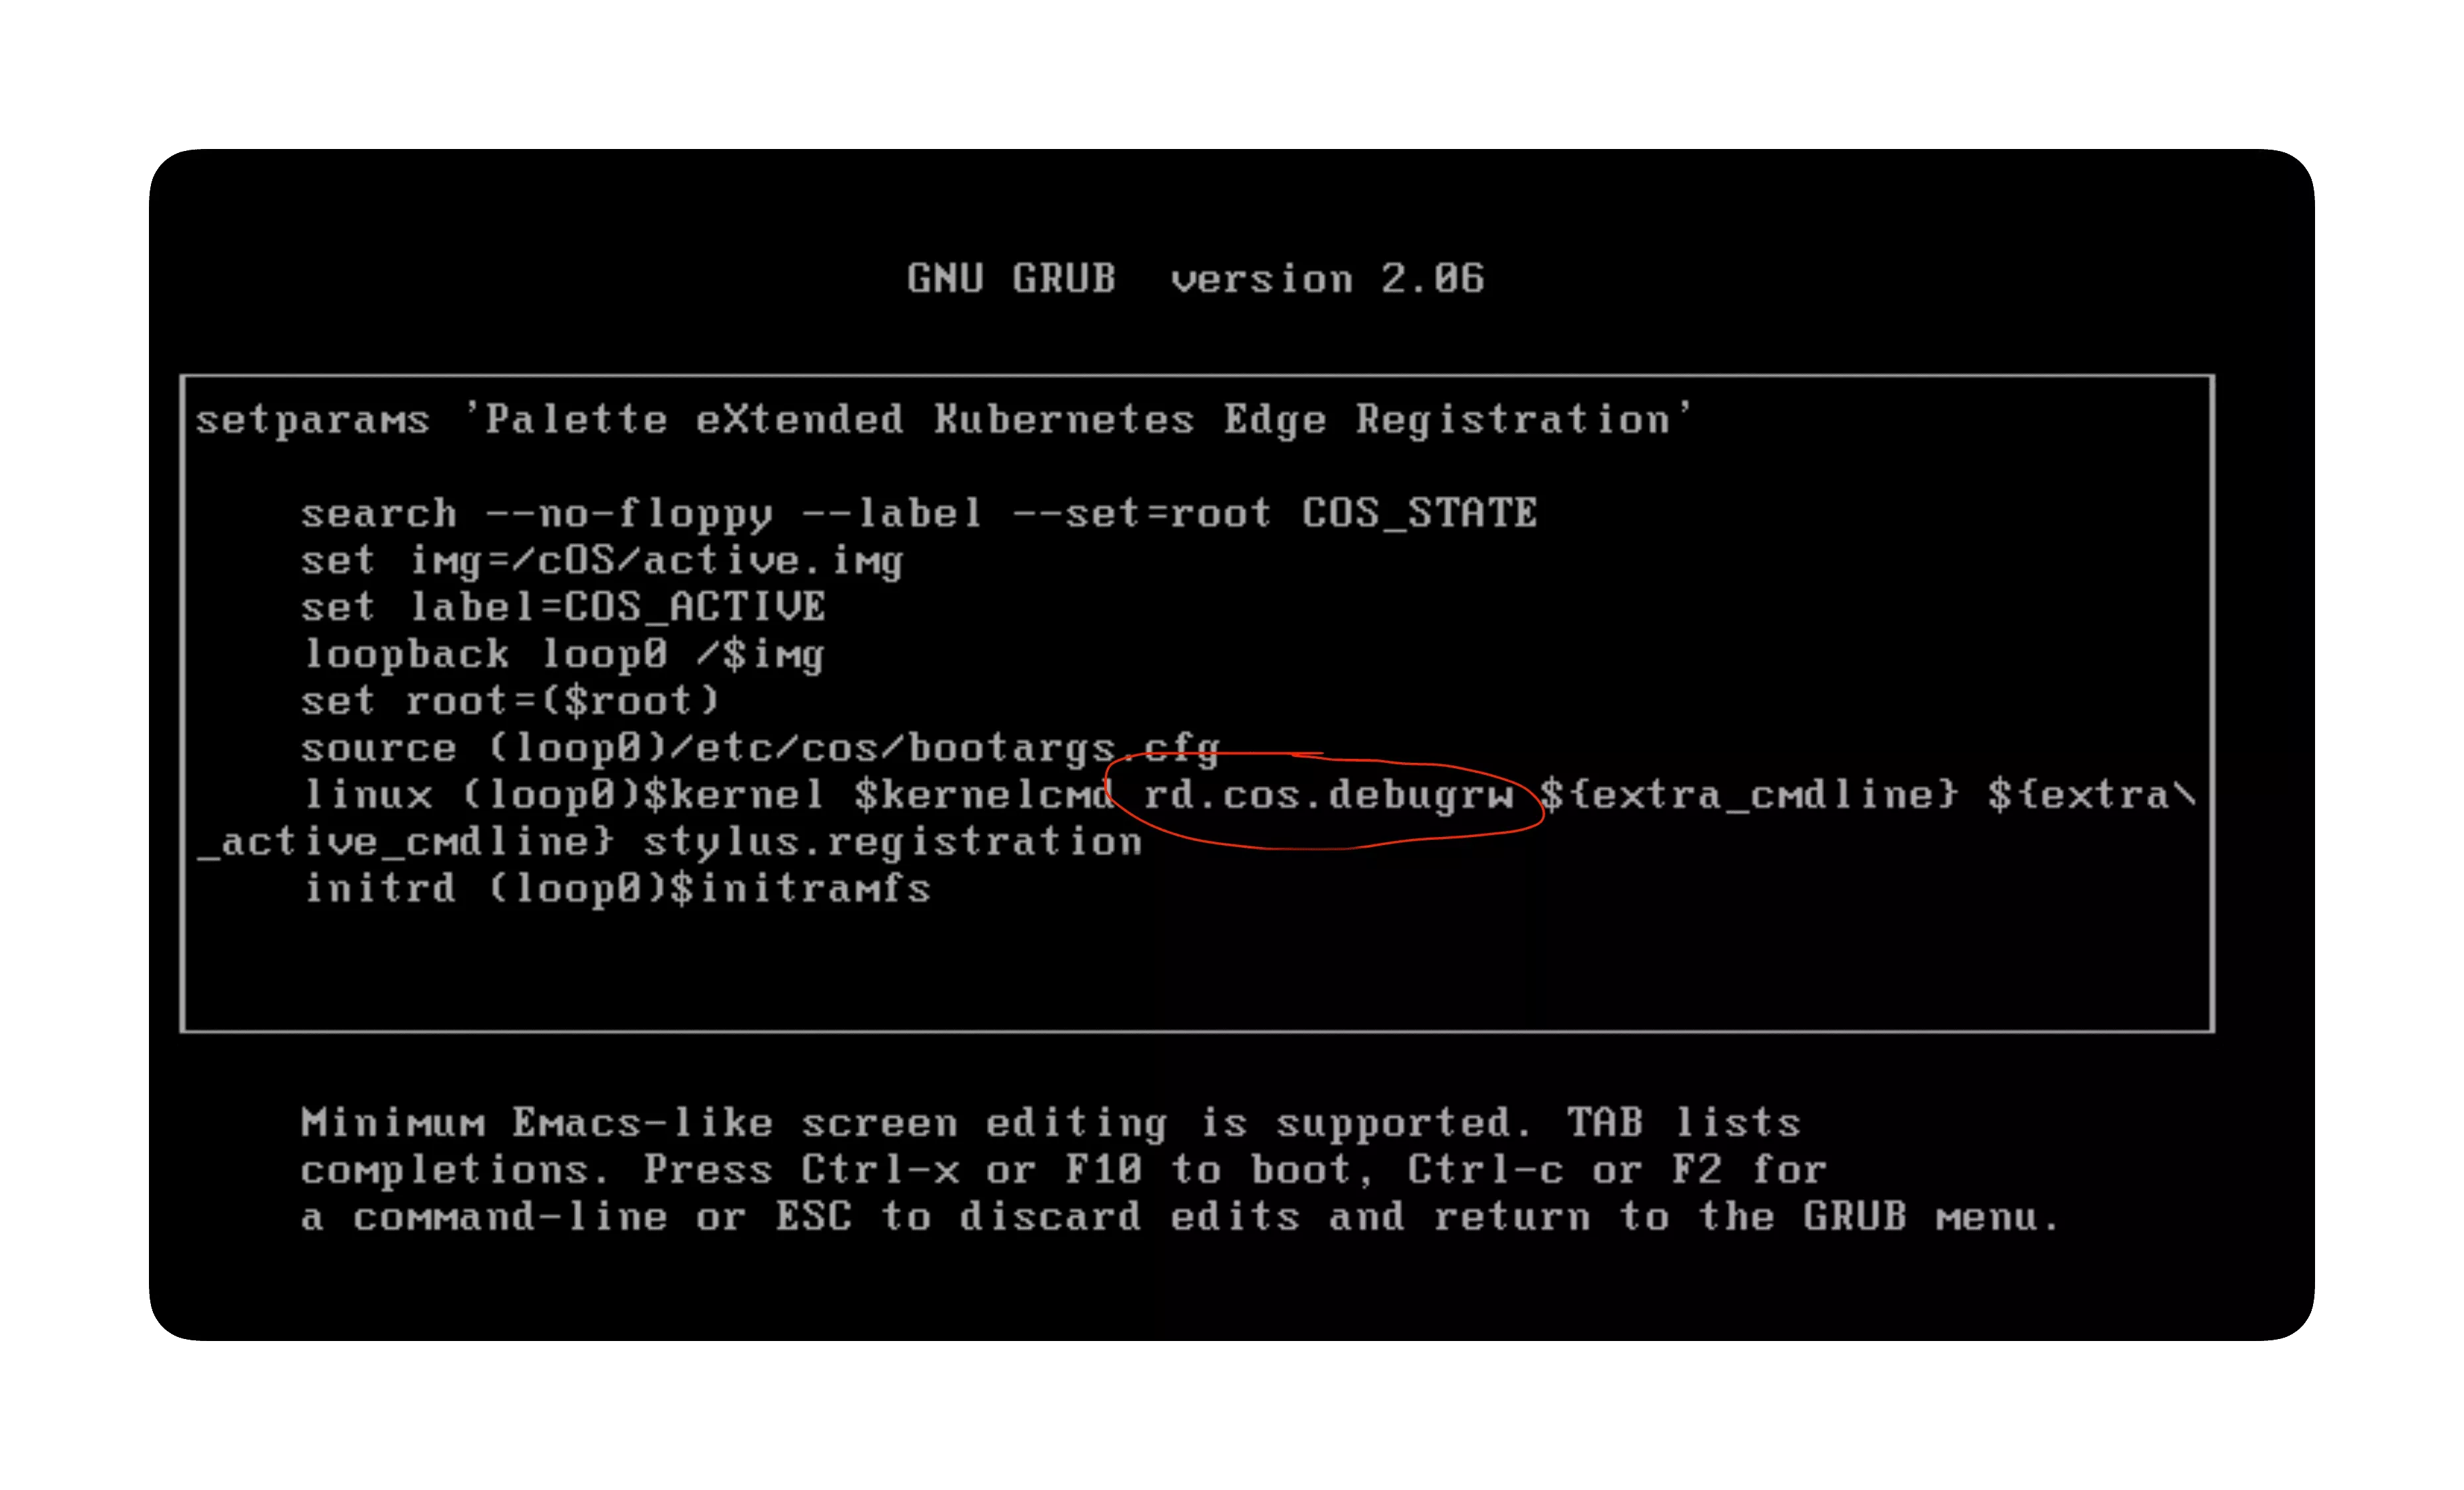
-
Press the keys CTRL + X to boot the system.
-
Make the required changes to the image.
-
Reboot the system to resume the default read-only file system.
Scenario - Pod State Unknown After Reboot with Overlay Network Enabled
On slower networks, it's possible that this is due to KubeVip leader election timeouts. To debug, you can manually adjust the values of related environment variables in the KubeVip DaemonSet with the following steps.
Debug Steps
-
Ensure you can access the cluster using kubectl. For more information, refer to Access Cluster with CLI.
-
Issue the following command:
kubectl edit ds kube-vip-ds --namespace kube-system -
In the
envof the KubeVip service, modify the environment variables to have the following corresponding values.env:
- name: vip_leaderelection
value: "true"
- name: vip_leaseduration
value: "30"
- name: vip_renewdeadline
value: "20"
- name: vip_retryperiod
value: "4" -
Within a minute, the old Pods in unknown state will be terminated and Pods will come up with the updated values.
Scenario - Palette Webhook Pods Fail to Start
If the Palette webhook pods fail to start, it may be due to the palette-lite-controller-manager pods encountering issues or not being available. Use the following steps to troubleshoot and resolve the issue.
Debug Steps
-
Ensure you can access the Kubernetes cluster using kubectl. For more information, refer to Access Cluster with CLI.
-
Open up a terminal session and issue the following command to check the status of the palette-lite-controller-manager pods.
kubectl get pods --all-namespaces | grep palette-lite-controller-managercluster-661acf1dfc746f8217de2712 palette-lite-controller-manager-6856746c8-7p9k2 2/2 Running 0 6mIf the pods are active and available with an age greater than five minutes, then the issue may be with the Palette webhook. Proceed to the next step.
infoIf the pods are not active, use the command
kubectl describe pod <pod-name> --namespace palette-systemto check the pod logs for more information about why the pods are not starting. Replace<pod-name>with the name of the pod that is not starting. Scroll down to theEventssection to view the logs. You can try to delete the pod and check if it starts successfully. If the issue persists, contact our support team by emailing. -
Check the status of the Palette webhook pods. Use the following command to verify the status.
kubectl get pods --namespace palette-systemNo resources found in palette-system namespaceIf the output displays a message stating No resources found in palette-system namespace then the lacking Palette webhook pods are the issue for the cluster not starting.
-
Delete all existing palette-lite-controller-manager pods using the following commands.
export NAMESPACE=$(kubectl get pods --all-namespaces | grep palette-lite-controller-manager | awk '{print $1}')
export PALETTE_POD_NAME=$(kubectl get pods --all-namespaces | grep palette-lite-controller-manager | awk '{print $2}')
kubectl delete pod $PALETTE_POD_NAME --namespace $NAMESPACE -
After a few seconds, verify that the palette-lite-controller-manager pods are active and available.
kubectl get pods --all-namespaces | grep palette-lite-controller-manager -
Check the status of the Palette webhook pods. A successful output should display the status of the palette-webhook pods.
kubectl get pods --namespace palette-systemNAME READY STATUS RESTARTS AGE
palette-webhook-548c55568c-p74zz 1/1 Running 0 2m -
If you continue to encounter issues, contact our support team by emailing support@spectrocloud.com so that we can provide you with further guidance.
Scenario - systemd-resolved.service Enters Failed State
When you create a cluster with an Edge host that operates the Red Hat Enterprise Linux (RHEL) and Ubuntu Operating
Systems (OS), you may encounter an error where the systemd-resolved.service process enters the failed state. This
prevents the nameserver from being configured, which will result in cluster deployment failure.
Debug Steps
-
Establish an SSH connection to the Edge host.
Alternatively, press the keys FN + CTRL + CMD + F1 on a keyboard that is connected to the Edge host to log in to the terminal. If you are on Windows, press FN + CTRL + ALT + F1.
-
Issue the following command.
chmod a+rwxt /var/tmp
systemctl enable --now systemd-resolved.service
This will start the
systemd-resolved.serviceprocess and move the cluster creation process forward.
Scenario - Degraded Performance on Disk Drives
If you are experiencing degraded performance on disk drives, such as Solid-State Drive or Nonvolatile Memory Express drives, and you have Trusted Boot enabled. The degraded performance may be caused by TRIM operations not being enabled on the drives. TRIM allows the OS to notify the drive which data blocks are no longer in use and can be erased internally. To enable TRIM operations, use the following steps.
Debug Steps
-
Log in to Palette.
-
Navigate to the left Main Menu and click on Profiles.
-
Select the Cluster Profile that you want to use for your Edge cluster.
-
Click on the BYOOS layer to access its YAML configuration.
-
Add the following configuration to the YAML to enable TRIM operations on encrypted partitions.
stages:
  boot.after:
    - name: Ensure encrypted partitions can be trimmed
      commands:
        - |
          DEVICES=$(lsblk -p -n -l -o NAME)
          if cat /proc/cmdline | grep rd.immucore.uki; then TRUSTED_BOOT="true"; fi
          for part in $DEVICES
          do
            if cryptsetup isLuks $part; then
              echo "Detected encrypted partition $part, ensuring TRIM is enabled..."
              if ! cryptsetup status ${part#/dev/} | grep discards; then
                echo "TRIM is not enabled on $part, enabling TRIM..."
                if [ "$TRUSTED_BOOT" = "true" ]; then
                  cryptsetup refresh --allow-discards --persistent ${part#/dev/}
                else
                  if cryptsetup status ${part#/dev/} | grep LUKS2; then OPTIONS="--persistent"; fi
                  passphrase=$(echo '{ "data": "{ \"label\": \"LABEL\" }"}' | /system/discovery/kcrypt-discovery-challenger "discovery.password" | jq -r '.data')
                  echo $passphrase | cryptsetup refresh --allow-discards $OPTIONS ${part#/dev/}
                fi
                if [ "$?" = "0" ]; then
                  echo "TRIM is now enabled on $part"
                else
                  echo "TRIM coud not be enabled on $part!"
                fi
              else
                echo "TRIM is already enabled on $part, nothing to do."
              fi
            fi
done -
Click on Confirm Updates to save the changes.
-
Use the updated profile to create a new Edge cluster or update an existing Edge cluster.
Scenario - Clusters with Cilium and RKE2 Experiences Kubernetes Upgrade Failure
When you upgrade your cluster from RKE2 1.29 to 1.30 and your cluster uses the Cilium Container Network Interface (CNI), the upgrade could fail with error messages similar to the following. This is due to an upstream issue. You can fix this issue by adding a few annotations to the Cilium DaemonSet.
Debug Steps
-
Connect to your cluster using kubectl. For more information, refer to Access Cluster with kubectl.
-
Issue the following command from the terminal edit the Cilium DaemonSet.
kubectl edit ds cilium --namespace kube-system -
Under
metadata.annotations, add the following annotations.metadata:
annotations:
deprecated.daemonset.template.generation: "1"
meta.helm.sh/release-name: cilium-cilium
meta.helm.sh/release-namespace: kube-system
container.apparmor.security.beta.kubernetes.io/cilium-agent: "unconfined"
container.apparmor.security.beta.kubernetes.io/clean-cilium-state: "unconfined"
container.apparmor.security.beta.kubernetes.io/mount-cgroup: "unconfined"
container.apparmor.security.beta.kubernetes.io/apply-sysctl-overwrites: "unconfined"
Download Node Logs from Edge Clusters
If you experience issues with your Edge cluster control plane or workloads, you can download the logs of your cluster nodes to help investigate the root cause as long as your cluster is in Healthy status.
The downloaded log archive includes the following systemd service log files as well as other log files related to the Palette agent:
- stylus-agent.service
- stylus-operator.service
- spectro-stylus-agent.service
- spectro-stylus-operator.service
- k3s.service
- k3s-agent.service
- rke2.service
- rke2-agent.service
- /var/log/stylus-upgrade.log
- /var/log/stylus-upgrade-script.log
- /var/log/stylus-init-upgrade.log
- /var/log/kube-init.log
- /var/log/kube-join.log
- /var/log/kube-upgrade.log
- /var/log/kube-post-init.log
- /proc/cmdline
Debug Steps
-
Log in to Palette.
-
Navigate to the left Main Menu and click on Clusters.
-
Select the cluster whose logs you want to download.
-
In the upper-right corner of the cluster page, click Settings.
-
In the drop-down Menu that appears, click Download Logs.
-
Check the Node Logs box and click Download. You may also download logs from other components at the same time.
Scenario - Kubelet Process Cannot Access kubeadm-flags
If using the FIPS version of Agent Mode on a Rocky Linux edge host, SELinux may incorrectly label the kubeadm-flags.env file during cluster deployment or when certain configurations are adjusted, preventing the Kubelet from accessing it and properly managing the cluster. To resolve this issue, reset the SELinux context of the Kubelet environment variable to its default state based on SELinux policy rules.
Debug Steps
-
After deploying the cluster, monitor the Kubelet status.
systemctl status kubelet -
Check the logs for messages related to SELinux denials and kubeadm-flags.env.
ausearch -message avc --start recent | grep kubeadm-flags.envThe following output indicates that SELinux security policies are denying read operations attempted by the Kubelet.
time->Wed Jan 17 14:32:01 2025
type=AVC msg=audit(1673968321.452:456): avc: denied { read } for pid=1234 comm="kubelet" name="kubeadm-flags.env" dev="sda1" ino=56789 scontext=system_u:system_r:kubelet_t:s0 tcontext=unconfined_u:object_r:default_t:s0 tclass=file permissive=0 -
Reset the SELinux context of the Kubelet environment variable to its default state.
restorecon -v /var/lib/kubelet/kubeadm-flags.env -
Restart the Kubelet to apply your changes.
systemctl restart kubelet
Scenario - Agent Mode Deployments CNI Folder Permission Issues
Agent mode clusters that use PKX-E as the Kubernetes layer have the contents of the /opt/cni/bin folder set
incorrectly. This prevents the CNI that do not run as root, such as Cilium, from operating.
Debug Steps
-
Log in to Palette.
-
Navigate to the left Main Menu and click on Profiles.
-
Click on the profile used by your agent mode cluster.
-
In the OS pack of your agent mode cluster profile, configure the following cloud-init stages. The same commands are executed in multiple stages to ensure that they take effect.
stages:
boot.before:
   - name: "Ensure CNI directory permissions on restart"
      if: '[ -d /opt/cni/bin ]'
      commands:
      - chown root:root -R /opt/cni/bin
boot:
   - name: "Ensure CNI directory permissions on restart"
      if: '[ -d /opt/cni/bin ]'
      commands:
      - chown root:root -R /opt/cni/bin
boot.after:
   - name: "Ensure CNI directory permissions on restart"
      if: '[ -d /opt/cni/bin ]'
      commands:
- chown root:root -R /opt/cni/bin -
Save the changes as a new version of the cluster profile and update your agent mode cluster to use the updated profile. For more information, refer to Update a Cluster.